clay hand building techniques worksheet
FORM- Three-dimensional shape and structure of an object. Begin by Adding Large Sections of Clay to Build the Body.
My Clay Handbuilding Notes John Norris Net
This technique is one of the most commonly used hand-building methods.
. Flatten the clay between your palms then lay it between two sheets of plastic wrap. Download it once and read it on your Kindle device PC phones or tablets. They use hand building techniques radial design and their knowledge of healthy foods to create unique mini-sized meals for a wall display.
A base for throwing hand building or drying. Roll out a thin coil of sticky clay and place it along one edge. Beth has over 30 years of experience crafting with clay.
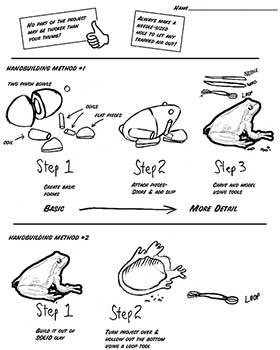
Create an object using clay that can be fired baked in the oven or air dried. Mastering Clay Hand Building. Building a form by joining sections that have been cut from sheets of damp clay.
Oct 26 2021 - Explore Lorraine Buchans board CLAY handouts and worksheets followed by 152 people on Pinterest. Techniques Tips And Tricks - Kindle edition by Davich Forrest. The file comes in both full page and two-per-page to help with printing and for use in an interactive notebook.
It includes written instructions and visuals to show each step and four slab slumping techniques. Place clay on the cloth between the strips of wood and roll out. See more ideas about clay ceramics projects pottery techniques.
Making small marks into the surface of the clay before adding slip or water to help fuse. Using the phrases in the word bank below place them in the correct order for each style or technique of ceramics hand building. Works as glue to fuse two clay pieces together.
This activity directs individuals to create a mask for themselves. Firing is a term used for cooking the clay. Slab handbuilding clay ceramics slumpingslabs.
Fired once ware that has glaze applied and is waiting to be glaze fired. Using your palms press and roll the lump toward you. Rotate and roll out again repeating this sequence until the clay is as thin as you desire.
Up to 24 cash back Build an Armature or Skelton to Support Your Clay Structure While Building Optional Depending on Your Sculpture Add Clay to Your Structure. Find hand building lesson plans and teaching resources. Roll with a rolling pin being careful that no wrinkles develop in the plastic.
THIS SET IS OFTEN IN FOLDERS WITH. Small portions of fireable clay will be available at the Craft Center Kit. Then they asked to write something about themselves in the banner below the shield.
Pick up the clay set it back down and again press and roll it toward you. The answer key is. The condition of a clay body that has dried somewhat but can still be carved or joined.
Each project has a rubric with specific requirements and guidelines. Carefully pull the uppermost piece of wrap straight back and away from the clay. Revolve the ball while pressing the walls out evenly with the other hand.
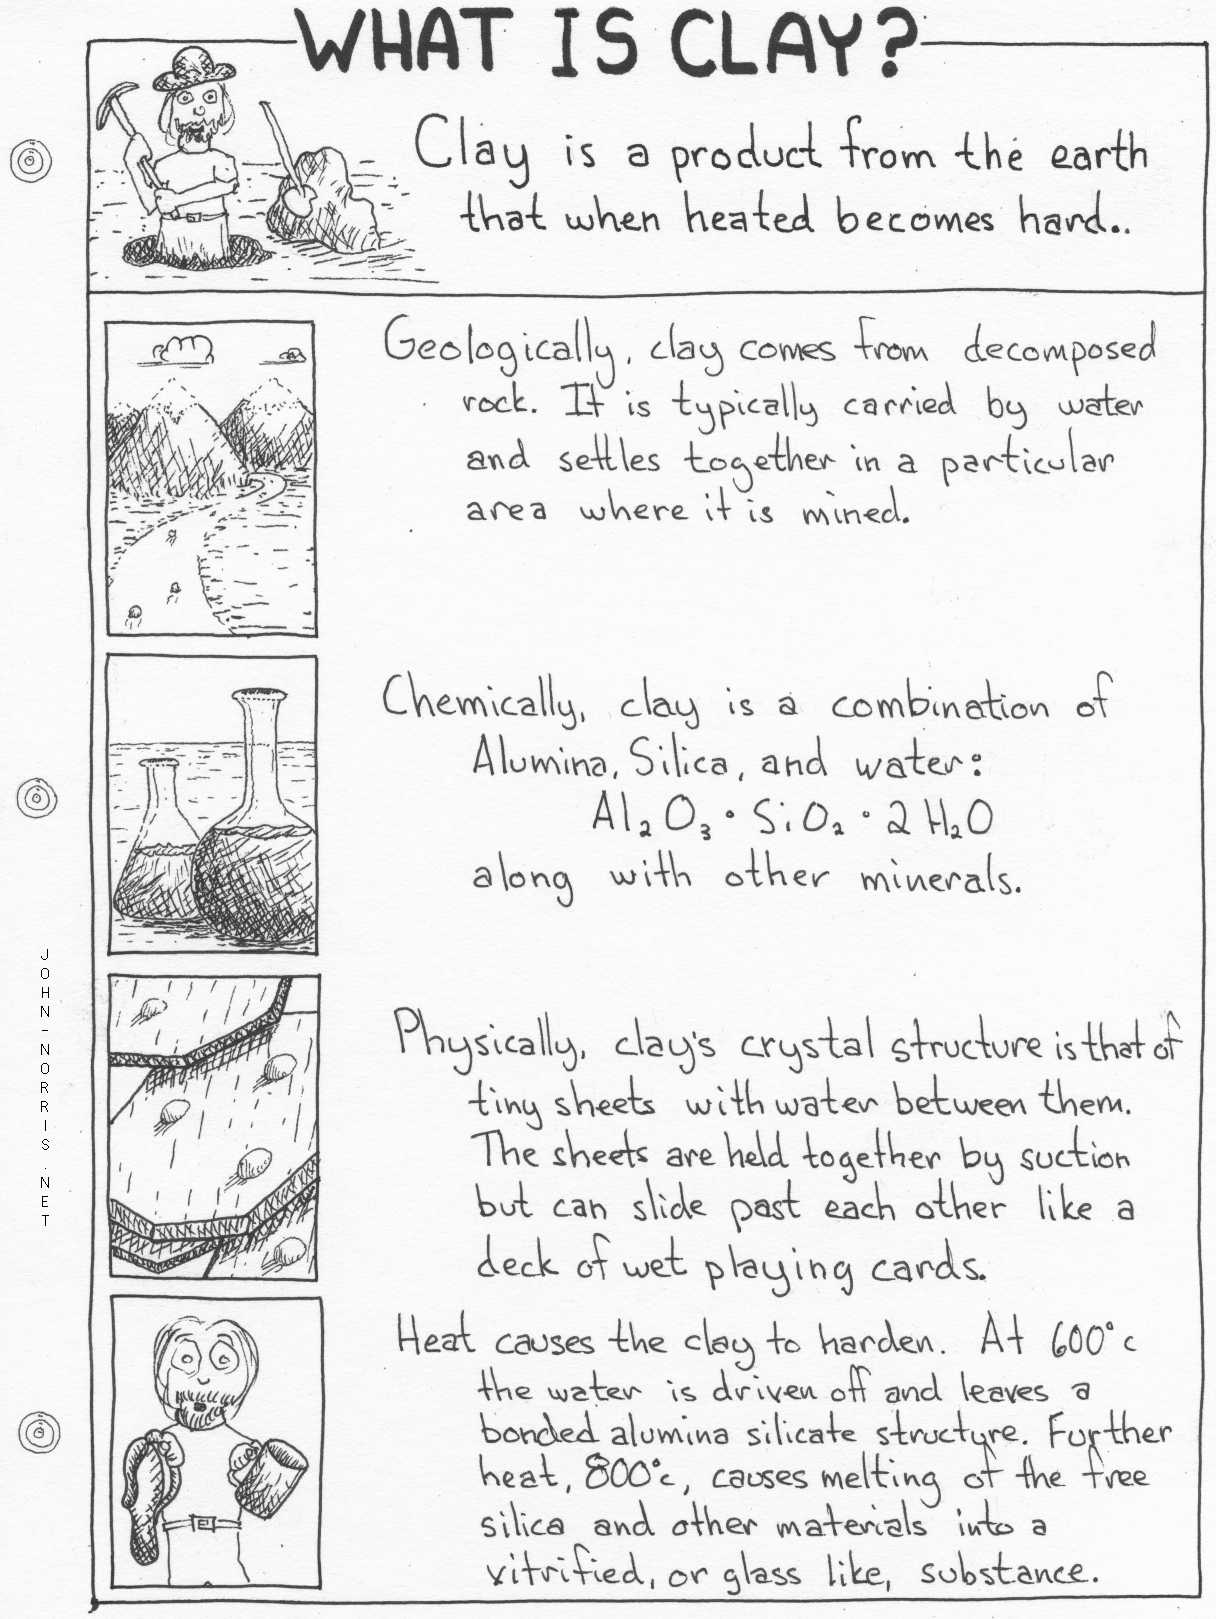
You will also learn the science of clay as the material is transformed from a soft fragile state into a hard permanent piece of clay. Build Your Sculpture Further by Adding Smaller Sections of Clay to Form Attachments. FIRE - To bake in a kiln.
Handbuilding 101 with The Clay Lady. Use a pointed tool to trim the slab of clay to the desired size. Clay hand building techniques worksheet Written By marts Wednesday March 9 2022 Add Comment Edit Beth Peterson is a pottery expert sharing her knowledge about producing pottery on the wheel as well as handbuilt ceramic sculpture and the Raku firing technique of pottery making.
Begin by forming a smooth ball that fits in your palm fist size. The part of the vessel between the lip and shoulder. This worksheet is designed to help the students understand what Henry Clays American System was about and how the three pieces interact with each other.
Up to 24 cash back Next you will learn the clay hand-building techniques by using slab coil and sculpting in the creation of an African inspired mask that will become a wall-hanging piece. Techniques Tips And Tricks. Place a lump of clay on a porous surface such as concrete or canvas.
Pinch pots are some of the oldest archaeological artifacts found on the planet. Repeat this process until the lump of. Slumped Clay Slabs for Visual Art Classes This printable worksheet shows the handbuilding technique using clay slabs.
Clay pinch slab and coil pots are some of the oldest crafts in human history. You may make paper patterns to follow if a form that has a number of sides is desired. Beth Peterson is a pottery expert sharing her knowledge about producing pottery on the wheel as well as handbuilt ceramic sculpture and the Raku firing technique of pottery making.
Join us live via Zoom to learn some fun hand building processes to make a small bowl cup or other vessel. Well chat about the properties of clay and a variety of simple processes you can do at home with tools you have on hand. Press the thumb into the center half-way to the bottom.
Use features like bookmarks note taking and highlighting while reading Mastering Clay Hand Building. Up to 24 cash back Hand-Building Techniques 28 pts Name Hour _____ 1. Artwork made with a combination of materials or techniques.
Pinch pots are created by using your hands to shape the clay. Learners discuss what makes a healthy and balanced meal and then they make them out of clay. Rub a wet finger over the edges to be joined and score with a tool.
Browse clay hand building resources on Teachers Pay Teachers a marketplace trusted by millions of teachers for original educational resources. Rope like pieces of clay that are stacked to form a wall and build the object. About Press Copyright Contact us Creators Advertise Developers Terms Privacy Policy Safety How YouTube works Test new features Press Copyright Contact us Creators.
She also teaches mask making to children and adults. Phrases can be used more than once for DIFFERENT projects. Basic Pottery Hand Building Techniques.
From hand building clay projects worksheets to hand building ceramics videos quickly. Hand building forms by shaping clay inside on top of or around an object. Usually made of plastic plywood or plaster.
A mixture of clay and water.